IDAutomation Barcode Label
Software
Manual & Tutorial
IDAutomation Barcode Label Software is an easy-to-use
WYSIWYG
barcode label printing software application that prints barcodes, text
and
graphics on standard laser and inkjet printers, in addition to thermal
transfer
printers.
INDEX:
IDAutomation Barcode Label Software is built to run on any operating
system that supports the Microsoft® .NET Framework (Although the
Framework
is no longer required in version 2009). It is compatible with Windows 98
and above, including ME, 2000, XP, 2003, 2008, Vista and Windows 7.
- Download and open or unzip the package to a folder on the hard
drive.
It is recommended to download and install
WinZip if the computer that is
installing the product does not have a zip file extraction tool.
- Run the setup EXE to start the install utility.
- If there is a popup message that states that Microsoft .NET
Framework
needs to be installed first, please do so and run EXE file
again. The Microsoft .NET Framework may be installed by running
Windows Update from
a computer connected to the Internet or may be downloaded
from here.
Versions 2009 and later: After setup completes, the EXE file
that
appears in the program directory may be placed on external media such as
a USB
drive and run by itself from any Windows system. It does not reply upon
any
setup process, installed components or DLLs and operates as a virtual
application. Please ensure the application is properly licensed when
using the
software in this manner.
Installation on a Network Drive for
Multiple
Users
Because this product does not install any DLLs or other components
in
the system directories, it may be easily installed and run from a
network
or a mapped drive.
- Start the install utility.
- When prompted for the location, select the network drive and
complete
the install process.
- Create shortcuts on other computers that need to run the
application.
- If errors occur on any of the computers, try performing the steps
outlined in the document about
setting security rights for .NET applications.
- Make sure there is a license for each user that has access to the
software.
By using the process outlined here, labels can be created that
include
barcodes, text and graphics. After the label is created, it can be saved
and retrieved for later use.
Create a Custom Label Video
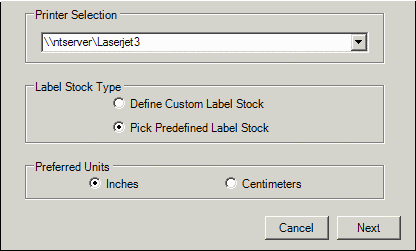
- After the label application is installed, open the software from
the appropriate program group and icon, and choose "Create New Label."
- At the "Label Options" screen, select the printer that the labels
will be printed to, the label stock type, and the preferred units of
measure. Predefined label stock contains several definitions for Avery,
Herma, Zweckform and a few others. (When using thermal barcode
printers,
it is recommended to choose the "Define custom label stock" option.)
Click Next.
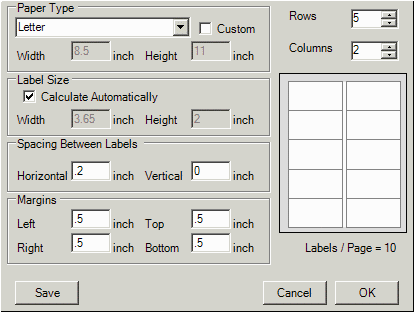
- When choosing the "Define Custom Label Stock" option, the selections
on the next screen will allow the label software to automatically
calculate
the size of each label. Choose or verify the following, and then click
OK:
- The number of rows and columns of the label sheet. For thermal
printers, leave the rows and columns at their defaults and choose
the label from the "paper type" drop down box.
- The spacing between labels.
In this example, Avery® 5263 laser labels are being
used; therefore 5 rows and 2 columns were selected. Also added was
spacing between labels of 0.2; smaller labels may use only .1 or
.05 in these fields. Notice how the label size is automatically
calculated. The label layout can be saved from this screen
by clicking the save button; this allows the user to easily select
it as a predefined label file stock in the future by choosing
"Predefined
Label Stock" and then selecting "Custom" from the label products
list.
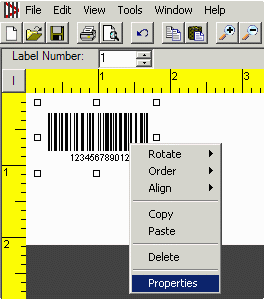
- On the next screen, click the appropriate object to add text,
barcodes,
graphics and objects into the design area. If there is a gray border
in the design area, this indicates an area where the selected printer
is not able to print. The
Pro and
RFID versions include additional objects for GS1-DataBar (RSS),
Composite, MICR, PDF-417, Data-Matrix and other 2D barcode types.
- Properties of any object may be adjusted by performing a right-click
on the object and choosing "Properties".
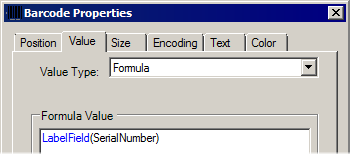
- When selecting the barcode icon, choose the Value tab from the
Properties
window. This determines the value to be encoded in the barcode. This
is where an incremented, formula or static value, or a
link to an external database may be
created. Learn more about adjusting the
properties
of an object.
- Choose the print icon when ready to print the labels.
- Verify or select the print range and choose Print. (It is
recommended
to print only a few labels at first to verify the alignment to the
printer.)
If the labels do not print accurately, try adjusting the margins and
the spacing between labels in the Label Stock Properties screen by
choosing
File - Label Stock Properties.
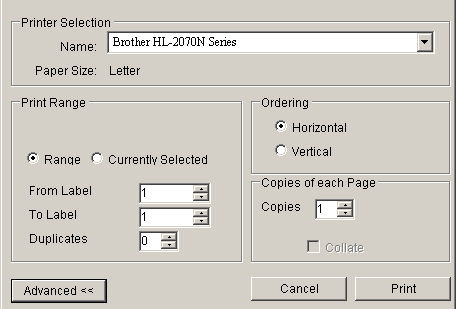
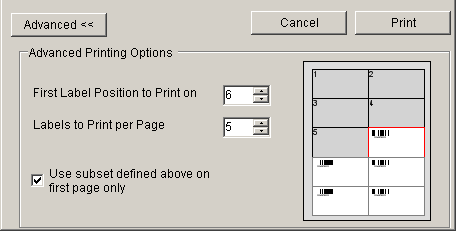
- If needing to print to a specific label on the sheet, click the
Advanced button for placement options.
How to use the Print Range Features Video
Label Fields (Available only in 2009 or later versions) may be
used to simplify updates when multiple objects on a label
use the same information. For example, a text object and a barcode
object may
contain the same serial number field that creates a unique incremented
number
for each label printed. Label Fields may be constant values or
incrementing
numbers. Incremented number fields keep track of which numbers have been
printed
in previous print jobs, so that each label has a unique number. When the
label
is opened the next time for printing, the serial number fields begin
incrementing at the
next unused number.
How to use the Field and Variables Features Video
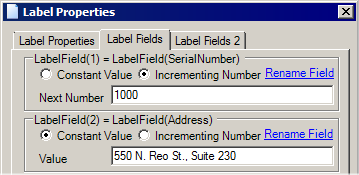
Use the following procedure to setup Label Fields:
- With the label open, choose Edit - Properties.
- Choose the Label Fields tab.
- Choose Constant Value or Incrementing Number and enter any
necessary values or
numbers. Choose the Rename Field option to create a friendly name for
the
field.
- After the fields are created and applied, they may be used in the
Value
tab with a VB Script formula.
|
Linking
to External Data Sources & Databases
|
This barcode label software can link to columns in Microsoft® Access,
Excel or a CSV text file as a data source for a text or barcode object,
which allows printing of labels from data in Excel and Access or from a
file export from other software. IDAutomation's label software can also
link to a custom embedded data source.
The Pro
and RFID versions provide linking to multiple data sources, powerful
database macros and support for additional data sources including ODBC,
DSN, Oracle and SQL Server.
Link to External Source Video
Perform the following to link to the data
source:
- Choose Tools - Data Sets - Link External Data.
- Choose the data type and choose Search to find the file.
- After the source path is found, choose the appropriate table if
applicable.
- Choose Link Data; a portion of the linked data should then appear
on the screen.
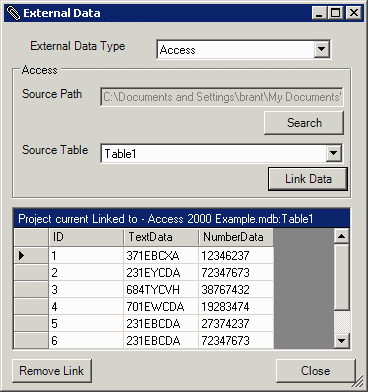
- After the data is linked, choose Close.
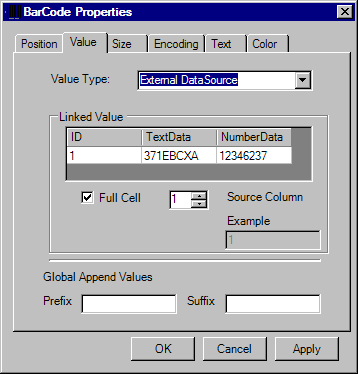
- To link a column of data to a barcode
or text object, click the down arrow next to "Value Type" and select
"External DataSource", and click on the source column to link the value.
The example window will show what is linked.
- Increment the "label number" in the design screen to verify the
data is linked.
- When printing, choose "all rows data source" as the option, but
only after printing a single page first to verify the alignment.
- When linking to the CSV or Text files, the format should be as
follows:
CSV: "Column1","Column2","Column3"
TEXT: Column1,Column2,Column3
NOTE: fields containing numbers
beginning
with zero must be in CSV format and included in parenthesis.
IDAutomation's barcode label software allows the user to create a
database,
which is embedded in the label data file itself. This allows data entry
of several different custom values to be created on labels.
- Choose Tools - Data Sets - Create Embedded DataSet.
- By default, three columns are created. Use the buttons at the bottom
of the window to add, remove or export the data.
- Choose the OK button at the bottom of the window when finished.
- To link a barcode to the data entered, right click on the barcode,
choose Properties, choose the Value tab and select External Data
Source as the value type.

Properties may be adjusted by right-clicking on the
object and choosing Properties. The following is a list of common
properties
and their functions in each tab:
- Position - allows user to manually place the barcode in the
design area and change the orientation.
- Value - this is the data that is encoded in the barcode.
Please note that some barcodes such as DataBar, IntelligentMail, UPC
and EAN accept only numbers and a specific number of digits. Entering
data that is incorrect for the barcode type may cause unpredictable
results.
- Global append values will append a prefix or suffix to the
value. For example, an incremented value of 101 and a prefix of
TX will create a barcode encoding TX101 on label 1 and TX102 on
label 2.
- The formula value creates the barcode from the VB syntax
formula
entered. For example, the formula of "TX"
& 100 + L# will create a barcode encoding TX101 on label
1 and TX102 on label 2.
- The following is a list of what is supported:
- Operators:
/ divide
* multiply
& concatenate words
- subtract
+ add
VBCRLF adds a new line
- Variables:
L# label number
T# total number of labels. Example:
"This is label " & L# & " of " & T#
produces This is label 2 of 5.
- Label Fields:
LabelField(name) returns the value of the Label
Field. Label fields may be incrementing serial numbers or static
constant
values and are created in the properties tab of the label (Edit -
Properties -
Label Fields). Available only in 2009 or later versions.
Example:
LabelField(SerialNumber)
- External Data:
Field(col) returns the value in the linked data source
for the column [col] of the current row. Example:
Field(1)
FieldName(name) returns the value in the linked data
source for the column according to the current row. Example:
FieldName(FirstName). If a header row is linked in and two
names are the same, the second name appends a “1”, for example
"CompanyName" and "CompanyName1". If one of the columns
is blank, it will be referenced as F# where # is the column
number. The linked Value Table displays the TableName of
each item.
- Additional variables,
macros and external database functions are available
in the Pro and RFID versions of the software.
- Size - this is where the barcode height, width and margins
are defined.
- Increasing the Bar Width (X dimension) will increase
the width of the entire barcode. Because most barcodes require
specific settings in this area, the barcode cannot be sized by dragging
its edges in the design window. The default X dimension is 0.03
CM or about .012" or 12 mils. This value may need to be lowered
if the scanner cannot read barcodes with small X dimensions. When
working with a high-quality
barcode scanner, this value can be decreased to obtain a higher
density barcode.
- The measurement of mils is an industry standard that
is 1/1000 of an inch.
- White Bar Increase is the percentage of increase of the
white bars compared to black bars. This property may be used when
a printer prints darker than normal to increase the amount of white
space between bars and improve readability. Recommended values are
15% - 25% for ink jet printers. Default = 0 (no increase).
- Encoding - this tab defines applicable
Barcode
Properties:
- Size - the size of the symbol is changed by adjusting
the barcode
X Dimension and
Height.
- Barcode Encoding - this is the type of barcode or the
symbology. The default is Code-128, which encodes numbers, text
and other information.
- Use Check Digit - automatically adds the check digit
to the barcode. The check digit is required for all symbologies
except Code 39, Interleaved 2 of 5, Industrial 2 of 5 and Codabar.
When using symbologies that do not require the check digit, the
check digit option may be disabled. In cases where the check digit
is already provided in the data source, the check digit option may
be disabled.
- Text - allows the ability to change or disable the text that
is displayed next to the barcode.
- The Character Grouping field determines the number
of characters between spaces in the text interpretation of the data
encoded in the barcode. Default =0 (off); supported values are 3,
4 and 5.
- Color - allows changing the colors of the barcode, text and
background.
When ApplyTilde
is enabled in the "AUTO" setting for Code 128, additional capabilities
are
enabled:
Generating GS1-128 (UCC/EAN-128)
To generate GS1-128,
the parentheses
or tilde methods should be used as described in the
GS1-128
section of the Code 128 FAQ. For example, the SSCC18 data of
(00)008012349999999997 may be encoded as a GS1-128 barcode using the
parentheses
(00)008012349999999997 or with the
tilde
~21200008012349999999997. Additional
Tilde
capabilities are also available that allow calculation of the MOD 10
check
digit, for example ~2120000801234999999999~m17.
VB script formulas may also be used if desired to achieve the
same
result:
"(00)" & "008012349999999997"
Encoding Functions such as Tabs and Returns in Code 128
The format ~ddd may be used to specify the ASCII code of the character
to
be encoded. For example, Code~009Bar~013 will create a barcode that
encodes
Code<Tab Function>Bar<Return Function>. To find the values
for other functions,
refer to the ASCII
chart. Functions can be viewed when scanned with the
IDAutomation
Scanner
ASCII Decoder.
The Pro and RFID versions of the Barcode Label Software contains
additional
advanced features including VB scripting capabilities, additional
database
connectivity and support for MICR, DataBar (RSS), Composite, PDF417,
Data Matrix
and other 2D barcode types.
Connecting to additional data sources including
ODBC, DSN, Oracle and SQL Server:
- From the label software menu, choose Tools - Datasets - Link
External
Data.
- Select the link type and enter all necessary fields.
- After the link is setup, the user may link
to the data field from a barcode object
or use a VB Script formula to
generate the data to be encoded in the barcode.
Using VB Script formulas:
- In the Value dialog box for the barcode properties, select Formula.
- Enter the VB script formula to generate the data to be encoded in
the barcode.
- The following is a list of what is supported:
- Operators:
/ divide
* multiply
& concatenate words
- subtract
+ add
VBCRLF adds a new line
- Variables:
L# label number.
T# total number of labels. Example: "This
is label " & L# & " of " & T# produces
This is label 2 of 5.
User defined variables may be created with ‘$’ and the value can be
set with
"=", for example:
$myVar = “12345678”
- Macros:
- Chr(charcode) returns the character associated with
the specified charcode from the ASCII chart.
- Currency(expression, decimal) returns a number in
the correct regional currency. Default decimal number is 2.
Example for US settings: Currency(“12”,
2) produces the result of $12.00.
- Instr(haystack, needle) returns the index of the needle
(string being
searched) in the haystack (string to be searched). Example:
$a = "24680"
$b = Instr($a ,"6")
"6 is at position " & $b
The above will output “6 is at position 3”
- Len(source) returns the length of [source] text.
- Left(source,x) returns the first [x] characters in
[source] starting from the left.
- Mid(source,x,y) returns a substring of [source] starting
at position [x] of length [y].
- Number(source, optional decimal places =2, optional parenthesis
for negative numbers = False, optional group digits = True)
Example: Number(12.10, 2) produces
the result of 12.10;
Number(12.7, 4) produces the result
of 12.7000 and
Number(12.777, 2) produces the
result of 12.78.
- Right(source,x) returns the first [x] characters
in the [source] starting from the right. This macro may also be used to
ensure
zeros are appended to the beginning of a number field that must be a
certain
number of digits in length, such as the requirements for the
14
digit
GTIN.
Example: Right(“00000000000000” &
LabelField(UPC_Number),14)
- If(test-condition, true-expression, false-expression) If
evaluates
the test-condition and if true (or 1) the true expression is evaluated,
otherwise the false-expression is evaluated. For example:
$x = Right(L#,1)
$Result = (
if($x == "0", "Even",
if($x == "2", "Even",
if($x == "4", "Even",
if($x
== "6",
"Even",
if($x == "8", "Even", "Odd"))))))
L# & " is " & $Result
The above will produce “39 is Odd” if the label number is 39.
Valid Test Conditions: Numeric evaluation is the default and
lexical
string evaluation fall back (3 > 2).
== equal; <> or != is not equal; <= or
=< is less than or equal; >= or => is greater than or
equal;
< less than and > greater than.
- Date Macros:
- Date() returns the current date, 11/18/2010
- Time() returns the current time, 2:16 PM
- Year() returns the current year, 2009
- Month() returns the current month, 11
- MonthName() returns the current month name, November
- Day() returns the current day, 18
- DayName() returns the current day name, Wednesday.
- Conversions:
- Mod10(int) returns the
GS1
MOD10 check character which is often used in
SSCC-18,
GTIN,
GS1-128
and Data Matrix barcodes.
Example: Mod10(12345678901) returns 2
- ISO7064(text) returns the
ISBT K check character according to ISO7064.
Example: ISO7064(W000007123456) returns D
- Base4(int1, optional int2) returns base-4 where int1 is the
number to
convert to base-4 and int2 the number to add to each digit of the result
to
create an ASCII character, default = 48.
Example: BASE4(500) returns 13310 and
BASE4(500,65) returns BDDBA
- Base2(int1, optional int2) returns base-2 where int1 is the
number to
convert and int2 is the number to add to each digit of the result to
create an
ASCII character, default = 48.
Example: BASE2(5) returns 101 and
BASE2(5,65) returns BAB
This function may be used to create
hidden,
more secure barcodes with hidden text.
- Label Fields:
- LabelField(name) returns the value of the Label Field. Example:
LabelField(SerialNumber)
- External Data:
- Field(col) returns the value in the linked data source
for the column [col] of the current row. Example: Field(1)
- FieldName(name) - returns the value in the linked
data source for the column according to the current row.
Example: FieldName(FirstName). If a header
row is linked in
and two names are the same, the second name appends a “1”, for
example "CompanyName" and "CompanyName1". If one of the columns
are blank it will be referenced as F# where # is the column
number. The linked Value Table displays the TableName of each
item.
- Table(id).Field(row,col) returns the value in the
linked data source [id] corresponding to the respective [row]
and [col]. Example: Table(1).Field(L#,3)
- Table(id).Rows returns the number of rows of linked
data source [id].
- Table(id).Columns returns the number of columns of
linked data source [id].
NOTE: the linked data source (id) starts at 1. Columns are
numbered from left to right and start at 1. Choose Value Type
- External Database to preview the column numbers and associated
data.
Additional example formulas:
LabelField(CustomerNumber) &
LabelField(SerialNumber)
L# * 2 & "12345678" & Field(1)
"~212" & L# * 2 & "12345678" & Table(1).Field(L#,1)
2D and DataBar barcode types:
The Pro and RFID versions include several
additional
barcode properties. Additional barcode icons will appear in
applicable
version to allow the additional barcode support. A MICR icon is also
available in the Pro version to design and print checks without the
use of a font.
MICR Properties:
The MICR object creates MICR E-13B symbols without the use of a font.
Within this component, the character spacing and print intensity may
be adjusted if necessary. In the event that IDAutomation MICR Fonts
are installed, changing the "MICR Type" allows the use of the font with
adjustment in 1/100 font size increments.
The formatting options below may be used in the
value property to allow variable data, such
as a serial number or text, to be encoded in a RFID tag. Special
processing
is performed when a tilde character is used to properly format the data
to the tag and ensure it is correct. The processing operations that may
be performed are as follows:
- ~b??? informs the encoder that the data which follows is
binary data where ??? is the length of the binary data in bits.
For example, ~b00811001100 encodes 8
bits of the binary data 11001100 in the tag (which represents the number
204).
- ~n??? informs the encoder that the data which follows is
variable numeric data where ??? is the length of bits reserved
for encoding this number.
For example, ~n016170 encodes 170 which
is converted to binary as 0000000010101010. Because 16 bits are reserved
for this number, several zero bits are added to the beginning. This
may be necessary when encoding variable length serial numbers. Because
this number may be variable, a space or tilde must follow it if data
is to be encoded after the number.
- ~x??? informs the encoder that the data which follows is
hexadecimal data, where ??? is the length of bits reserved for
encoding. Four bits are reserved for each character. Therefore, multiply
??? by 4 to determine the total number of bits reserved in the tag for
this command.
For example, ~x016A1C3 encodes A1C3
as hexadecimal which is 1010000111000011 in binary format; 16 bits in
length.
- ~t??? informs the encoder that the data which follows is
variable text or ASCII data to be encoded where ??? is the length
of bits reserved for encoding. This process may be used to encode
standard
text or ASCII data in RFID tags. Up to 12 characters may be stored in
a 96 bit tag; 8 bits are required for each character. A tilde must
follow
this text if data is to be encoded after it. For example:
~t032TEXT~n016170
Additional information and examples are provided at the links
below.
Free product support may be obtained by reviewing the knowledgebase
articles
that are documented below and by searching the resolved
public
help
desk issues.
Priority
phone,
email and help desk support is provided up to 30 days after
purchase.
Additional priority
phone, email and help desk support may be obtained if the
Priority
Support
and Upgrade Subscription is active.
© Copyright 2000-2010 IDAutomation.com, Inc., All Rights Reserved.
Legal Notices.
|
