The Dell� PowerVault� 110T DLT VS160 Tape drive is a value-priced, high-reliability,
high-capacity linear streaming cartridge tape drive designed for use on entry
to midrange computing platforms. With a combination of data compression and
compaction, the PowerVault 110T DLT VS160 Tape drive offers a formatted
cartridge capacity of 80GB (160GB assuming a 2:1 compression ratio) and a sustained
user data transfer rate of 8 MB/s (up to 16 MB/s with 2:1 compression). The
capacity you realize in practice depends on the data set, which affects the
actual compression ratio.
The PowerVault 110T DLT VS160 Tape drive is a 5.25-inch, half-height form-factor,
using a 1/2-inch tape. Its design includes a four-channel read/write head, Lempel-Ziv
(DLZ) high-efficiency hardware data compression, and tape-mark directory to
achieve fast data throughput and data access times.
The PowerVault 110T DLT VS160 Tape drive is read/write-compatible the DLT
VS160 format using DLTtape VS1 cartridges and read compatible with the DLT1
format using DLTtape� IV cartridges. The PowerVault 110T DLT VS160 Tape drive
is an Ultra 160 SCSI device that works with any wide-ultra, Ultra2, Ultra160,
or Ultra3 Low-Voltage Differential (LVD) or Single-Ended (SE), narrow or wide,
SCSI bus.
Features
The PowerVault 110T DLT VS160 Tape drive has the following features:
Supported formats: DLT VS160 (read/write using DLTtape VS1 cartridges),
DLT1 (read only using DLTtape� IV cartridges)
Uses DLTtape VS1 cartridges
5.25-inch half-height form-factor
Formatted cartridge capacity of 80GB native, 160GB compressed*
Sustained user data transfer rate of 8 MB/s native, up to 16 MB/s with
compression*
The PowerVault 110T DLT VS160 Tape drive requires a wide-ultra, Ultra2,
Ultra160, or Ultra3, Low-Voltage Differential (LVD) or Single-Ended (SE) SCSI
bus
* Assumes 2:1 compression ratio. The capacity and data transfer rates realized
in practice depend on the data set, which determines the actual compression
ratio.
Obtaining Drivers and Firmware Upgrades
If the tape backup software does not detect the tape drive or to obtain the
latest operating system drivers and/or firmware upgrades, see the Dell Support
website at support.dell.com.
Tape Backup Software
Drivers
Microsoft® Windows® 2000 and Windows® Server� 2003: QSDLT32.SYS
Native Operating System Backup Utilities
Microsoft® Windows® 2000 and Windows® Server� 2003
Windows Backup
Red Hat Linux versions 7.3 and 8.0 and 9.0
Tar
Tape Backup Applications
NOTICE: See the Dell Support website
at support.dell.com to obtain the
latest patches and upgrades for the Tape Backup Applications noted below.
Microsoft® Windows® 2000 and Windows® Server� 2003
VERITAS� BackupExec� for Windows NT/2000 version 9.0 or later
Yosemite Tapeware® version 7.0 or later
Novell® NetWare®
VERITAS� BackupExec� for NetWare� version 9.0 or later
Yosemite Tapeware® version 7.0 or later
Red Hat Linux versions 7.3, 8.0, and 9.0
Yosemite Tapeware® version 7.0 or later
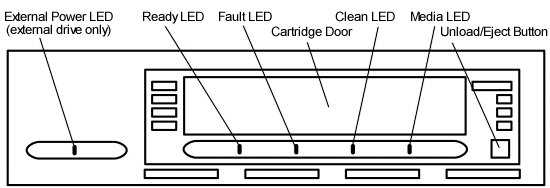
Front Panel Controls and Indicators
Location of the Controls and Indicators
Figure 1. PowerVault 110T DLT VS160 Tape drive front panel
NOTE: The front panel controls and indicators
are in the same locations on both the internal and external drives. The
internal drive does not have a Power LED.
Indicator Activity During Power-On
Self-Test (POST)
Every time you turn on or reset the drive, it conducts a Power-On Self-Test
(POST). This test ensures that the drive is working properly and is ready to
use. While POST is in progress, watch the front panel LEDs to see the progress
and results of the test. During POST, the following actions take place:
The LEDs illuminate one at a time, from left to right, starting with the
Ready LED, next the Fault LED, and finally the Clean LED, at approximately
one second intervals
About four seconds later, the Media LED illuminates
Each LED signals a different part of the POST process
All LEDs then turn off momentarily
If a cartridge is not loaded, the Ready LED illuminates and POST is complete,
the entire process taking approximately eight seconds
If a cartridge is loaded, the Ready LED flashes while the drive mounts the
cartridge, a process that can take several minutes depending upon the position
of the media in the tape path
As POST completes, the drive makes a slight buzzing noise for several seconds.
This noise is normal and should be ignored
The drive is now ready to use.
Indicator Activity During Normal Operation - Ready LED
When the PowerVault 110T DLT VS160 Tape drive is in use, the Ready LED
indicates the three states detailed in Table 1.
The Ready LED operates independently of the other three LEDs.
Table 1. Ready LED activity and drive status
Ready LED Activity
Drive Status
Off
No power to the drive
On
Power is on; no cartridge loaded or a loaded cartridge
is idle with no tape motion
Blinking
The drive is loading a cartridge or a loaded cartridge
has tape motion indicating read, write, seek, rewind, calibration, or other
cartridge activity
Indicator Activity During Normal Operation - Fault/Clean/Media LEDs
The Fault, Clean, and Media LEDs indicate the status of the drive. Note that
the LEDs can indicate more than one of the indicated operating conditions simultaneously.
For example:
If cleaning is required while a DLT1 format cartridge is loaded, both the
Clean and Media LEDs are on
If an internal write/read diagnostic fails as a result of a permanent write
error, both the Fault and Clean LEDs blink slowly.
Table 2 describes what each front panel indicator
means.
Table 2. Fault/Clean/Media LED activity and
drive status
Indicator
Activity
Operating Condition
Fault
Slow Blink (1x per second)
User initiated write/read diagnostic failed
Fast Blink (3x per second)
Servo or mechanism error
On
Internal firmware error
Clean
Slow Blink (1x per second)
Calibration error or permanent write/read error
Medium Blink (2x per second)
Cleaning in progress
On
Cleaning required
Media
Slow Blink (1x per second)
Unsupported format, or damaged or unsupported cartridge type inserted
into drive
The Unload/Eject button provides features in addition to unloading and ejecting
a cartridge. To activate one of these features, press and hold the Unload/Eject
button for the amount of time specified in Table 3.
Release the Unload/Eject button when the desired LED sequence is displayed.
If you do nothing for 15 seconds after accessing any of the additional features
that require an action, such as loading a cartridge, the drive returns to normal
operating mode.
NOTICE: The Unload/Eject button
features indicated by an asterisk (*) in Table
3 overwrite all data on the cartridge loaded in the drive. Use extreme
caution when accessing these features to avoid loss of important data.
Table 3. Unload/Eject button features
LED Status
Button Hold Time (seconds)
Feature Description
Ready
Fault
Clean
Media
On
N/A
N/A
N/A
0-6
Normal unload/eject function
Blinking
Off
Off
Off
6-9
Reserved
Blinking
Blinking
Blinking
Off
12-15
Reserved
Blinking
Blinking
Blinking
Blinking
15-18
Reserved
On
Off
Off
Off
18-21
Revert to normal operating mode
On
On
Off
Off
21-24
Write/read diagnostic mode*
On
On
On
Off
24-27
Reserved*
On
On
On
On
27-30
Emergency reset
Off
Off
Off
Off
30+
Revert to normal operating mode
Unload/Eject Button Feature Description
Normal Unload/Eject
When you release the button, the drive unloads and ejects the cartridge.
Write/Read Diagnostic Mode
NOTICE: This mode overwrites all
data on the cartridge in the drive. Use extreme caution when using this
feature to avoid loss of important data.
When you release the button, the drive initiates an internal write/read diagnostic.
The diagnostic requires that you first load a cartridge that is blank or does
not contain valuable data. When the diagnostic begins, the drive writes and
then reads approximately 400MB of data and then unloads and ejects the cartridge.
The process takes about two minutes. If the diagnostic test detects no errors,
the drive returns to normal operating mode. If an error occurs, the appropriate
LEDs illuminate.
Emergency Reset
When you release the button, the drive performs a hard reset, behaving as if
it had been turned off and then on. A standard POST then takes place.
Revert to Normal Operating Mode
When you release the button, the drive returns to normal operation.