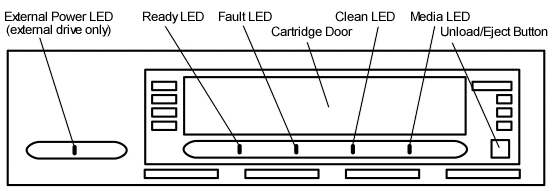
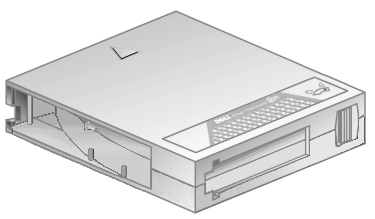
Figure 1. PowerVault 110T DLT VS160 Tape drive front panel
NOTE: The front panel controls and indicators
are in the same locations on both the internal and external drives. The
internal drive does not have a Power LED.
Indicator Activity During Power-On Self-Test (POST)
Every time you turn on or reset the drive, it conducts a Power-On Self-Test
(POST). This test ensures that the drive is working properly and is ready to
use. While POST is in progress, watch the front panel LEDs to see the progress
and results of the test. During POST, the following actions take place:
The LEDs illuminate one at a time, from left to right, starting with the
Ready LED, next the Fault LED, and finally the Clean LED, at approximately
one second intervals
About four seconds later, the Media LED illuminates
Each LED signals a different part of the POST process
All LEDs then turn off momentarily
If a cartridge is not loaded, the Ready LED illuminates and POST is complete,
the entire process taking approximately eight seconds
If a cartridge is loaded, the Ready LED flashes while the drive mounts the
cartridge, a process that can take several minutes depending upon the position
of the media in the tape path
As POST completes, the drive makes a slight buzzing noise for several seconds.
This noise is normal and should be ignored
The drive is now ready to use.
Indicator Activity During Normal Operation - Ready LED
When the PowerVault 110T DLT VS160 Tape drive is in use, the Ready LED
indicates the three states detailed in Table 1.
The Ready LED operates independently of the other three LEDs.
Table 1. Ready LED activity and drive status
Ready LED Activity
Drive Status
Off
No power to the drive
On
Power is on; no cartridge loaded or a loaded cartridge
is idle with no tape motion
Blinking
The drive is loading a cartridge or a loaded cartridge
has tape motion indicating read, write, seek, rewind, calibration, or other
cartridge activity
Indicator Activity During Normal Operation - Fault/Clean/Media LEDs
The Fault, Clean, and Media LEDs indicate the status of the drive. Note that
the LEDs can indicate more than one of the indicated operating conditions simultaneously.
For example:
If cleaning is required while a DLT1 format cartridge is loaded, both the
Clean and Media LEDs are on
If an internal write/read diagnostic fails as a result of a permanent write
error, both the Fault and Clean LEDs blink slowly.
Table 2 describes what each front panel indicator
means.
Table 2. Fault/Clean/Media LED activity and
drive status
Indicator
Activity
Operating Condition
Fault
Slow Blink (1x per second)
User initiated write/read diagnostic failed
Fast Blink (3x per second)
Servo or mechanism error
On
Internal firmware error
Clean
Slow Blink (1x per second)
Calibration error or permanent write/read error
Medium Blink (2x per second)
Cleaning in progress
On
Cleaning required
Media
Slow Blink (1x per second)
Unsupported format, or damaged or unsupported cartridge type inserted
into drive
The Unload/Eject button provides features in addition to unloading and ejecting
a cartridge. To activate one of these features, press and hold the Unload/Eject
button for the amount of time specified in Table 3.
Release the Unload/Eject button when the desired LED sequence is displayed.
If you do nothing for 15 seconds after accessing any of the additional features
that require an action, such as loading a cartridge, the drive returns to normal
operating mode.
NOTICE: The Unload/Eject button
features indicated by an asterisk (*) in Table
3 overwrite all data on the cartridge loaded in the drive. Use extreme
caution when accessing these features to avoid loss of important data.
Table 3. Unload/Eject button features
LED Status
Button Hold Time (seconds)
Feature Description
Ready
Fault
Clean
Media
On
N/A
N/A
N/A
0-6
Normal unload/eject function
Blinking
Off
Off
Off
6-9
Reserved
Blinking
Blinking
Blinking
Off
12-15
Reserved
Blinking
Blinking
Blinking
Blinking
15-18
Reserved
On
Off
Off
Off
18-21
Revert to normal operating mode
On
On
Off
Off
21-24
Write/read diagnostic mode*
On
On
On
Off
24-27
Reserved*
On
On
On
On
27-30
Emergency reset
Off
Off
Off
Off
30+
Revert to normal operating mode
Unload/Eject Button Feature Description
Normal Unload/Eject
When you release the button, the drive unloads and ejects the cartridge.
Write/Read Diagnostic Mode
NOTICE: This mode overwrites all
data on the cartridge in the drive. Use extreme caution when using this
feature to avoid loss of important data.
When you release the button, the drive initiates an internal write/read diagnostic.
The diagnostic requires that you first load a cartridge that is blank or does
not contain valuable data. When the diagnostic begins, the drive writes and
then reads approximately 400MB of data and then unloads and ejects the cartridge.
The process takes about two minutes. If the diagnostic test detects no errors,
the drive returns to normal operating mode. If an error occurs, the appropriate
LEDs illuminate.
Emergency Reset
When you release the button, the drive performs a hard reset, behaving as if
it had been turned off and then on. A standard POST then takes place.
Revert to Normal Operating Mode
When you release the button, the drive returns to normal operation.
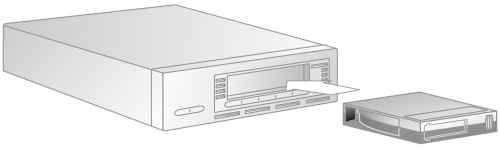
Loading a Tape Cartridge
The PowerVault 110T DLT VS160 Tape drive reads and writes DLTtape
VS1 cartridges. The PowerVault 110T DLT VS160 Tape drive can read - but
not write - DLTtape� IV cartridges written using the DLT1/VS80 format.
NOTE: The PowerVault 110T DLT VS160 Tape
drive automatically ejects any other cartridge types and any cartridges
whose format it cannot read. Make sure all cartridges that you want to use
for writing are DLTtape VS1 cartridges.
Loading a cartridge into the PowerVault 110T DLT VS160 Tape drive is fast
and easy. After the drive completes POST, insert the DLTtape VS1 cartridge
into the cartridge slot, oriented as shown in Figure 2, and push the cartridge
gently into the drive until it stops.
Figure 2. Loading a tape cartridge
The Ready LED blinks while the drive loads the cartridge. When the cartridge
is ready to use, the Ready LED is steadily illuminated. If the cartridge is
a DLTtape™IV written using the DLT1/VS80 format, the Media LED is also
steadily illuminated.
Unloading a Tape Cartridge
NOTICE: Do not remove a tape cartridge while
the Ready LED is blinking.
NOTICE: Remove the cartridge from the PowerVault
110T DLT VS160 Tape drive before turning off the external drive or the
host server for an internal drive. Leaving a cartridge in the drive when
power is off can result in cartridge and drive damage. When you remove the
cartridge from the drive, return the cartridge to its storage case to prolong
cartridge life.
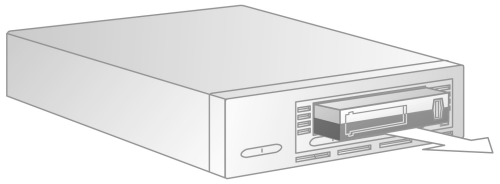
To eject a cartridge from the PowerVault 110T DLT VS160 Tape drive, follow these
steps:
Press the Unload button or use your backup software to eject the
cartridge. The Ready LED blinks while the drive rewinds the tape.
When the drive has rewound the tape, it ejects the cartridge.
Figure 3. Unloading a tape cartridge
Remove the cartridge from the drive.
Return the cartridge to its storage case to prolong cartridge life.
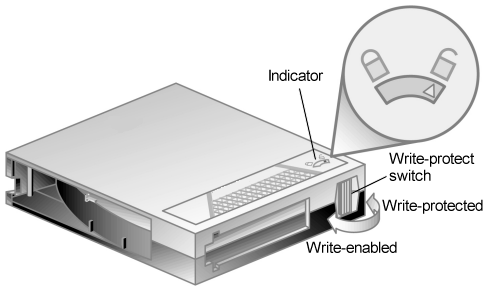
Setting the Write-Protect Switch on Tape
Cartridges
All Tape cartridges have a write-protect switch to prevent
accidental erasure of data. Before loading a tape cartridge into the
PowerVault 110T DLT VS160 Tape drive, make sure the write-protect
switch on the front of the cartridge is positioned as desired.
Slide the switch to the right to write-protect the cartridge. The "locked"
icon appears on the switch indicating that the cartridge is write-protected.
Slide the switch to the left to allow the PowerVault 110T DLT VS160 Tape
drive to write data to the cartridge. The "unlocked" icon appears
on the switch. The indicator on the top of the cartridge also points to the
appropriate icon, indicating the write-protect status of the cartridge.
Caring for Tape Cartridges
To ensure the longest possible life for all of your tape cartridges, follow
these guidelines:
Do not drop or strike a cartridge. Excessive shock can displace the tape
leader, making the cartridge unusable and possibly damaging the PowerVault
110T DLT VS160 Tape drive.
Store tape cartridges in their storage cases.
Do not expose tape cartridges to direct sunlight or sources of heat, including
portable heaters and heating ducts.
The operating temperature range for tape cartridges is 50° F to 104°
F (10° C to 40° C). The storage temperature range is 60° F to
90° F (16° C to 32° C).
If a tape cartridge has been exposed to temperatures outside the ranges
specified above, stabilize the cartridge at room temperature for the same
amount of time it was exposed to extreme temperatures, up to 24 hours.
Store tape cartridges in a dust-free environment in which relative humidity
is always between 20% and 80% (noncondensing). The ideal storage relative
humidity is 40%, ± 20%.
Do not place tape cartridges near sources of electromagnetic energy or
strong magnetic fields, such as computer monitors, electric motors, speakers,
or X-ray equipment. Exposure to electromagnetic energy or magnetic fields
can destroy data on cartridges.
Place identification labels only in the slide-in slot on the front of the
cartridge.
Never use any type of adhesive labels on tape cartridges.
Cleaning the Tape Mechanism
When the Clean LED is on, the PowerVault 110T DLT VS160 Tape drive's read/write
head needs to be cleaned. See Troubleshooting
the Drive in Troubleshooting for other conditions
that may indicate drive cleaning is necessary.
See Loading a Tape Cartridge to load
the cleaning cartridge. Cleaning typically takes several minutes, during which
the Clean LED blinks.
NOTICE: Use only Dell approved cleaning cartridges in the
PowerVault 110T DLT VS160 Tape drive. See Recommended
Tapes in Specifications for a list of approved
cleaning cartridges. Use of any other type of cleaning cartridge could damage
the read/write head in your drive. If you attempt to load any other type
of cleaning cartridge, the PowerVault 110T DLT VS160 Tape drive prevents
damage by ejecting the cartridge after approximately 25 seconds without
allowing the cleaning tape to come into contact with the read/write head.
Figure 5. DLTtape VS1 cleaning cartridge
Each cleaning cartridge has a useful life of 20 cleanings. The cleaning cartridge
includes a label with 20 small boxes printed on it. Always place a check mark
in a box each time you use the cartridge to clean the drive. Replace the cleaning
cartridge when all boxes are checked.
When the cleaning cartridge has cleaned the read/write head, the Clean LED
turns off and the drive ejects the cleaning cartridge.