PowerVault 110T-LTO Tape Drive Firmware Update
instructions for Windows, Linux, and Netware
SELECT A TAPE DRIVE
There
are two different models of PV110T LTO1s, each has
their own firmware upgrade tool and firmware file. In the picture below, click
on the tape drive that looks most similar to the one you are trying to flash.
This will link you directly to instructions for your drive.
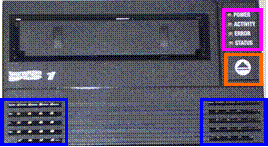
[Drive 1]
[Drive 2]
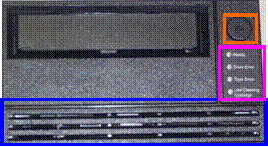
The main differences between the two drive varieties are the design and positioning of the eject button, the labels and positioning of the status lights, and a separated vs. continuous air vent. [Drive 1] has firmware update support under Windows, Novell, and Red Hat Linux. [Drive 2] has firmware update support under Windows only.
PowerVault 100T LTO1 Tape Drive Firmware Update Instructions
This upgrade adds the latest performance enhancing features to the PowerVault 110T LTO tape drive. This release will update the drive code level to V16142626-052.
Prior to
upgrading:
- Ensure the tape drive is
unloaded and the drive is in an idle state
(stop
service for all backup applications).
- Confirm a valid tape device
driver is installed and running on the
computer attached to the tape drive.
|
|
NOTE: x: represents the system root drive letter. |
Extract instructions
Download and run the file “R159730.exe”
from a Microsoft Windows Based System.
This will create the directory:
x:\dell\drivers\R159730\ containing
Linux
1.
Copy the file
R159730.tar.gz
file to the Linux system.
2.
Open a console session
and go to the directory where the file was saved and type the command: tar
–zxvf R159730.tar.gz
This will extract all files and relevant
subdirectories to the current directory.
The
following files will be extracted.
readme.htm - installation instructions in HTML format
readme.txt - installation instructions in text format
releasenotes.txt – release notes in text format
V16142626-052.IMG – Firmware image file
/Windows/DFU.exe –
executable for Windows Environments.
/Linux/DFU – executable for
Linux Environments.
/Netware/DFU.nlm – executable for Netware Environments.
IMPORTANT: If you have back up applications running
services such as Backup Exec or Arcserve you should
stop the services from running at this time. For help on stopping the services
see your Software Documentation.
Windows 2000/2003 Instructions
- Go to the directory x:\dell\drivers\R159730\Windows. Double Click on DFU.exe. A console screen will open up which will display general information regarding the utility.
- Press enter to begin the Utility. The utility will search the system for attached Tape devices and display a table of devices found.
- Each tape device found on the system will be represented by a device number. Select the device number for the device you wish to upgrade.
- A new screen will be displayed which will provide you with a new list of commands. Select 1 – Load Device Firmware.
- At the next prompt enter the path to the firmware image file i.e. x:\dell\drivers\R159730\V16142626-052.IMG and press return.
|
|
CAUTION: Do not remove power to
the tape drive during this process. |
- The console application will begin to update the firmware and provide a status throughout the process.
- Once the application completes, the screen will display the final status. If no errors occurred press return and the application will return to the device selection screen. If an error is found, please consult the DFU User’s Guide.
- If no other drives are to be updated enter the E option and press return to exit the application.
Linux Instruction
|
|
Note Linux
must be Enterprise Version 3 or higher with compiler GCC 3.2.3. If using earlier versions of linux i.e. AS
2.1 tools will not function due to GCC support. Either move drive to a supported Linux
system or a Windows system to perform update. |
- Open a console session and go to the directory where the files were extracted i.e. /dell/drivers/R159730/
- Type the command: ./linux/dfu and press return. A console application will start and display general information regarding the utility.
- Press enter to begin the Utility. The utility will search the system for attached Tape devices and display a table of devices found.
- Each tape device found on the system will be represented by a device number. Select the device number for the device you wish to upgrade.
|
|
Note: if you
do not see any devices check cabling and make sure the sg module is
loaded. You can issue
command “lsmod | grep sg”. If nothing
is returned type the command “modprobe sg” to start the sg service. |
- A new screen will be displayed which will provide you with a new list of commands. Select 1 – Load Device Firmware.
- At the next prompt enter the path to the firmware image file i.e. x:/dell/drivers/R159730/V16142626-052.IMG and press return.
|
|
CAUTION: Do not remove power to
the tape drive during this process. |
- The console application will begin to update the firmware and provide a status throughout the process.
- Once the application completes, the screen will display the final status. If no errors occurred press return and the application will return to the device selection screen. If an error is found, please consult the DFU User’s Guide.
- If no other drives are to be updated enter the E option and press return to exit the application.
|
|
Note: If
running the DFU utility from Console session 1, the following message may be
displayed: (scsi0:A:2:0): parity error detected in Data-in phase.
SEQADDR(0x1a6) SCSIRATE(0x93) The scsi0:A:2:0 value defines the SCSI identification of the tape
device. During the update process the
tape device will reset after the firmware is downloaded to the device. As the device is restarted, the DFU
application issues queries to the device.
These queries will result in the SCSI DATA-in Phase messages from the
Operating system because the device is not yet ready. This is a
warning message from the OS and can be disregarded as it does not indicate
any failures. These messages should
not be displayed if running the utility from X-Windows or any other console
session. |
Netware Instructions
- After downloading the self extracting zip package to a local system. Unzip the file and copy contents to a directory on your Netware system, i.e. sys:\public\dell
- Open a console session.
- At the console enter load sys:\public\dell\dfu.nlm and press return. A console application will start and display general information regarding the utility.
- Press enter to begin the Utility. The utility will search the system for attached Tape devices and display a table of devices found.
- Each tape device found on the system will be represented by a device number. Select the device number for the device you wish to upgrade.
- A new screen will be displayed which will provide you with a new list of commands. Select 1 – Load Device Firmware.
- At the next prompt enter the path to the firmware image file i.e. sys:\public\dell\V16142626-052.IMG and press return.
|
|
CAUTION: Do not remove power to
the tape drive during this process. |
- The console application will begin to update the firmware and provide a status throughout the process.
- Once the application completes, the screen will display the final status. If no errors occurred press return and the application will return to the device selection screen. If an error is found, please consult the DFU User’s Guide.
- If no other drives are to be updated enter the E option and press return to exit the application.
Dell Library & Tape Tools (Windows Only)
This
release will update the drive code level to E31E-6.306
Prior to upgrading:
- Ensure the tape drive is
unloaded and the SCSI bus is in an idle state (stop and or hold all backup
applications).
Installing
the Firmware Upgrade utility and Firmware image file
1.
Download and run the file
R159730
.EXE from a Microsoft Windows based system.
2.
Go to the directory x:\Dell\Drivers\ R159730\Windows. Click on the program Dell – LTT_Install.exe and follow the directions to complete the installation. This program will create the default directory
x:\Program Files\Dell Library & Tape Tools. Do NOT execute or start the
utility at this time.
3.
This will also install a copy of the Dell
Library & Tape Tools icon on your system desktop.
4.
Go to x:\Dell\Drivers\ R159730\Firmware and
move the file E31E.FRM to the directory x:\Program Files\Dell Library & Tape
Tools\firmware.
Upgrading
the firmware
1.
Click on the Dell Library
& Tape Tools icon on your system desktop or click on HP_LTT.exe in
the directory x:\Program Files\Dell Library & Tape Tools.
2.
The Dell Library & Tape Tools – Version 2.7 window
will appear.
3.
The upgrade utility will search for any Dell
PowerVault 110T LTO drives attached to the system.
4.
Click on the By Product tab in the left frame
(default).
5.
Select the HP Ultrium 1-SCSI drive you want to upgrade.
6.
Click on the Firmware icon above.
7.
Instructions for upgrading will appear on the left
screen.
8.
Select the device listed on the right frame that you
wish to upgrade.
9.
Firmware File: Ultrium 1-SCSI, REV E31E/OEM1,
N/A should appear in the firmware file option list. If not, browse to the directory you installed
E31E.FRM in step 4 under Installing the
Firmware Upgrade utility and Firmware image file section above.
10. Click on Start Update button.
11. A warning message will appear. After reading the message, click OK.
12. A confirmation message will pop up. After reading the message, click OK.
13. The drive will begin to upgrade the firmware. This may take up to 4 minutes. The 4 LEDs on the drive will flash/solid
during the upgrade. Do not remove
power to the drive during this time.
14. At the end of the upgrade, a window will appear with
the results of the upgrade.
15. Once the upgrade is complete, click OK and
close the application.
16. The drive is now upgraded.
17. Reboot the PowerVault 110T LTO Tape Drive and the
system connected to the LTO tape drive.