

This white paper provides an overview of the HP Thin
Client Imaging Tool and instructions for obtaining and deploying the
restore image. The HP Thin Client Imaging Tool is part of the
Package-for-the-Web deliverable that contains the original factory image
for HP Thin Clients.
hp-support-head-portlet
- ${title}
Loading...
Welcome to HP Customer Support
hp-contact-secondary-navigation-portlet
- ${title}
Loading...
hp-hero-support-search
- ${title}
Loading...
hp-share-print-widget-portlet
- ${title}
Loading...
hp-concentra-wrapper-portlet
- ${title}
Loading...
HP Thin Clients - Creating a Bootable USB Flash Device and Restoring the Thin Client Operating System Flash Image
System Requirements
Software
-
Microsoft Windows 7
Hardware
-
A desktop PC and one or more HP Thin Clients USB flash device (if using the USB Format option) Compatible USB flash devices are available from http://www.hpshopping.com.
-
USB flash device (if using the USB Format option) Compatible USB flash devices are available from http://www.hpshopping.com.
note:
This restore method will not work with all USB flash devices. USB flash devices with multiple partitions generally do not support this restore method. The range of USB flash devices available on the market constantly changes. Not all USB flash devices have been tested with the HP Thin Client Imaging Tool.
Before using the utility, you must download the appropriate image from http://www.hp.com/#Support.
By default, the XPe/WES thin client platforms have the
boot-order set to USB first, followed by HDD/ATA Flash, and finally
Network. It is recommended that you change the boot-order to Network
first if you choose to restore the image via a remote management tool.
This can be done locally through the BIOS setup or remotely by script
execution of the HP Add-On (Configure BIOS Settings) through the remote
management tool of your choice. Please consult the
Configure_BIOS_Settings text file found within the HP Add-On (Configure
BIOS Settings) for details about changing the boot order.
The HP Add-On (Configure BIOS Settings) may be downloaded from http://www.hp.com/#Support.
Getting Started
Two deployment options are supported by this utility. You can choose to do one or both of the following:
-
Create a bootable flash image on a USB flash device (such as a drive key).
-
Unpack the components of the image to a directory for use in a custom deployment scenario.
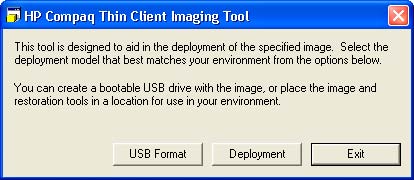
Download and run the Package-for-the-Web deliverable
(an .exe file) that contains the original factory image for the thin
client. The HP Thin Client Imaging Tool (CRStart.exe) runs automatically
and displays the following dialog:
Choose one of the deployment options. Each option is described in the following sections:
-
USB Format - Formatting a USB Flash Drive
-
Deployment - Unpacking the Image and Tools for Deployment
note:
During the restore process, the thin client flash drive is reformatted and all data on it is erased before the system image is copied to it. To prevent loss of data, be sure that you have saved any user-created data from the flash drive. During the first restart of the thin client following the restore process, there may be a delay of approximately 5-10 minutes to unbundle the software before the Windows Desktop is displayed.
Formatting a USB Flash Device
-
Connect your USB flash device (drive key). Ensure that only one USB flash device is connected to the system.
-
Click USB Format.
-
Select the USB drive from the list, using the up and down arrows to display the correct drive letter. If the USB drive is not in the list, click Update Drives, then scroll through the list again.
note:
During the next step, the USB drive is reformatted and all data on it is erased before the bootable image is copied to it. To prevent loss of data, be sure that you have saved any data from the USB drive to another drive.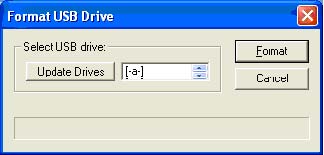
-
Click Format.
-
Connect the bootable USB flash device to the thin client. You can only attach one bootable USB device to the thin client during this process.
-
Restart the thin client.
-
When prompted with Do you want to continue? [Y/N], click Y to begin the image restore process on the thin client.
Unpacking the Image and Tools for Deployment
-
Click Deployment.
-
When prompted, select the destination directory for the imaging tools and image.
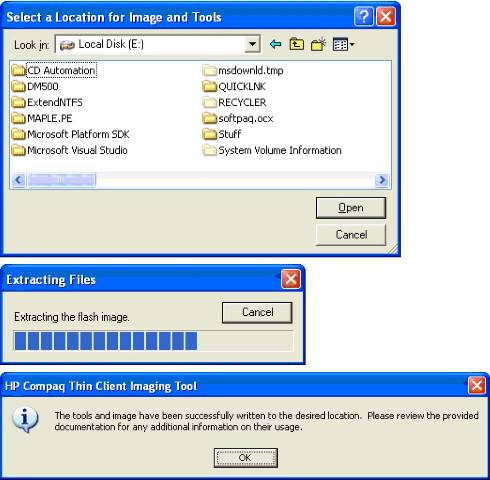 The components that comprise the deliverable are then unpacked to the specified directory. You may then utilize the files such as the IBRPE.EXE (the image restoration utility) and FLASH.IBR (the OS image) for your custom deployment scenario.
note:
It is recommended that you restore the image via a USB flash device to a single thin client unit, configure the image on the thin client as desired, capture the image from the thin client, and deploy the final captured image to your desired thin clients using the Image capture/deploy capability of your remote management tool of choice. Please refer to your remote management tool documentation for additional information.
HP recommends that you restore the image via a USB
flash device to a single thin client unit, configure the image on the
thin client as desired, capture the image from the thin client, and
deploy the final captured image to your desired thin clients using the
Image capture/deploy capability of your remote management tool of
choice. Please refer to your remote management tool documentation for
additional information.
hp-feedback-input-portlet
- ${title}
Loading...
hp-online-communities-portlet
- ${title}
Loading...
hp-feedback-banner-portlet
- ${title}
Loading...
hp-country-locator-portlet
- ${title}
Loading...
Country/Region:
 United States
United States
hp-detect-load-my-device-portlet
- ${title}
Loading...
 Report product content issues


