Selecting [Standard] to Install
This explains the procedure for automatically searching for a device on a network and installing a driver ([Standard]).
Prerequisites
Confirm that the following conditions are satisfied. Complete the preparation operations.
A TCP/IP Network Environment
If you do not know the network environment you are using, check with your network administrator.
The device must be in the same subnet as the computer you are using.
When starting the computer, log on as a member of Administrators.
[Desktop] screen display (when using Windows 8/8.1/Server 2012/Server 2012 R2)
Procedures
1.
Start the installer.
If you are using an installer downloaded from the web site
Double-click the downloaded file to decompress it. If the installer does not start automatically after it is decompressed, double-click [Setup.exe].
If you are using the accompanying CD-ROM
(1) Set the CD-ROM in the computer → click [Installation].
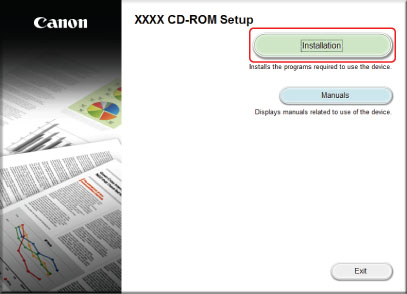
(2) In the [Installation] screen, confirm the driver → click [Installation].
If the CD-ROM menu is not displayed, click "Open details."
In the following procedure, start the installer.
For Windows Server 2003/2003 R2:
Double-click the CD-ROM icon in [My Computer] → double-click [MInst.exe].
For Windows Server 2003/2003 R2:
When the [Tap to choose what happens with this disc.] message is displayed: Click the message → click [Run MInst.exe].
When the [AutoPlay] dialog box is displayed: Click [Run MInst.exe].
When Windows Explorer is displayed: Double-click [MInst.exe].
When nothing is displayed (Windows10): From Explorer, double-click the CD icon in [This PC] > [Devices and drives].
When nothing is displayed (Windows 8/8.1/Server 2012/Server 2012 R2): Click Explorer in the [Desktop] screen → double-click the CD icon in [Computer].
When nothing is displayed (Windows Vista/7/Server 2008/Server 2008 R2): Double-click the CD-ROM icon in [ ] (Start) > [Computer].
] (Start) > [Computer].If the above [MInst.exe] does not exist:
Double-click [Setup.exe].
32-bit version: 32BIT\Setup.exe
64-bit version: x64\Setup.exe
2.
Read the license agreement → click [Yes].
3.
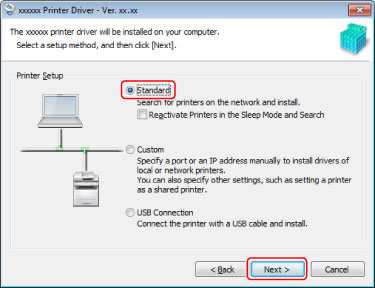
Select [Standard] → click [Next].
[Reactivate Printers in the Sleep Mode and Search]: Select this when you want to detect devices on the network that are in sleep mode.
[Display Readme File]: Click this to refer to the Readme file.
4.
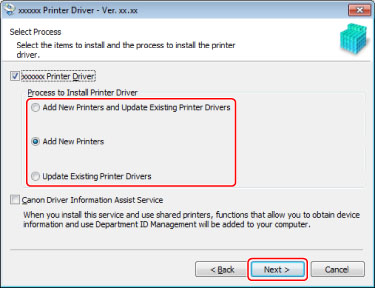
Select the required items → click [Next].
[Process to Install Printer Driver]: Select this if necessary if a driver is already installed.
[Canon Driver Information Assist Service]: Select this when you want to use the device information retrieval function.
5.
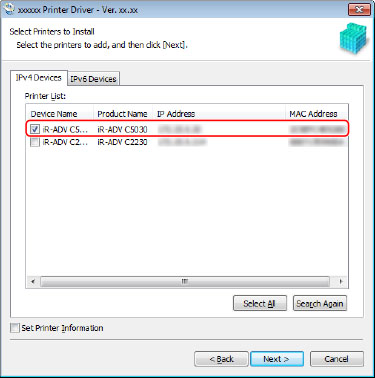
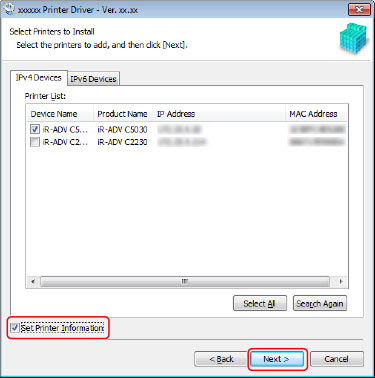
Select the device to install from [Printer List].
If the device is not displayed in [Printer List], click [Search Again]. If the device is still not found, select [Custom] and install.
[IPv4 Devices]/[IPv6 Devices] tab: If you are using Windows Vista/7/8/8.1/10/Server 2008/Server 2008 R2/Server 2012/Server 2012 R2, you can switch displays by clicking the tabs.
6.
If you want to change the name of the device, or set it as the default device, select [Set Printer Information] → click [Next].
If you do not want to change the name of the device or set it as the default device, click [Next] and proceed to step 8.
7.
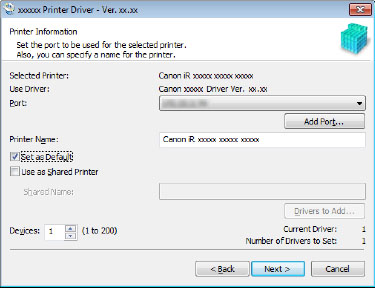
Change [Printer Name] if necessary → click [Next].
[Set as Default]: Select this to set the device as the device that is normally used.
[Use as Shared Printer]: Select this if you want to configure shared settings for the device.
Check [Printer List for Driver Installation] → click [Start].
Proceed with the installation according to the instructions on the screen.
9.
Click [Restart] (or [Exit]).
The installed device is displayed in [Devices and Printers], [Printers and Faxes], or [Printers] in the Windows Control Panel.
In Windows 10, the installed device is displayed in [Settings] > [Devices] > [Printers & scanners] > [Printers].